
Appearance
Vue 组件基础
以 构建工具 + Runtime 的方式运行的 Vue 项目,不支持把模板代码写到 index.html 的 <div id="app"> 容器中。取而代之的,要把模板代码写到后缀名为 .vue 的文件中,这种 .vue 结尾的文件叫做“Vue 单文件组件(英文简称:SFC,Single File Component)”,简称 “Vue 组件”。
把 SFC 组件渲染到页面上
改造 src/App.vue 组件,清空其中的默认内容,并添加 <template> 虚拟元素。Vue 官方规定:SFC 组件的模板结构,必须放到 <template> 元素中:
vue
<!-- 在 template 中定义要渲染的模板结构 -->
<template>
  <h1>count 的值是:</h1>
  <button>+1</button>
</template>改造 src/main.js 项目入口文件,参考如下三个步骤,把 App.vue 中的模板结构渲染到 index.html 的 id 为 app 的 div 中:
js
import { createApp } from 'vue'
// 1. 导入单文件组件
import App from './App.vue'

// 2. 把单文件组件作为参数,传递给 createApp() 函数
// const app = createApp(SFC单文件组件)
const app = createApp(App)

// 3. 指定要把单文件组件的模板内容,渲染到哪个容器中
app.mount('#app')最后,请确保 index.html 中 id 为 app 的 div 是一个空元素,否则会导致页面渲染闪烁的问题。
在 SFC 中定义数据
SFC 的 <template> 中需要用到的数据或方法,需要定义到 <script> 标签中。例如:
vue
<template>
  <!-- 在这里定义模板结构 -->
</template>

<script>
// 在这里定义数据和方法等 js 逻辑
</script>传统方式(不推荐)
在 Vue3 推出 <script setup> 新特性之前,我们需要参考如下的方式在 <script> 中定义数据:
vue
<!-- 在 template 中定义要渲染的模板结构 -->
<template>
  <h1>count 的值是:{{ count }}</h1>
  <button @click="count++">+1</button>
</template>

<script>
import { ref } from 'vue'

// 使用 export default 导出一个对象,
// 在对象中通过 setup 函数向外 return 数据
export default {
  setup() {
    const count = ref(0)
    return { count }
  }
}
</script>我们发现 <script> 中的第 8 行和第 14 行是定义数据的核心代码。除此之外的其它代码行都是冗余的(在多个 .vue 组件中,每次都要重复写一遍)。
<script setup> 语法糖
为了简化 <script> 中的冗余代码,Vue 官方推出了 <script setup> 语法糖:定义在 <script> 中的数据/方法/计算属性等成员,可以直接在 <template> 模板结构中被使用。不必再通过 setup() 向外 return 了。
使用 <script setup> 改造后的代码如下:
vue
<!-- 在 template 中定义要渲染的模板结构 -->
<template>
  <h1>count 的值是:{{ count }}</h1>
  <button @click="count++">+1</button>
</template>

<script setup>
import { ref } from 'vue'
const count = ref(0)
</script>在 SFC 中定义样式
基本用法
如果需要美化 SFC 的 <template> 模板结构的样式,则需要把样式写到 <style> 标签中。例如:
vue
<template>
  <!-- 在这里定义模板结构 -->
</template>

<script>
// 在这里定义数据和方法等 js 逻辑
</script>

<style>
/* 在这里定义 css 样式,从而美化 template 中的模板结构 */
</style>示例代码如下:
vue
<template>
  <h1 class="title">count 的值是:{{ count }}</h1>
  <button @click="count++">+1</button>
</template>

<script setup>
import { ref } from 'vue'
const count = ref(0)
</script>

<!-- 样式定义到 style 标签中 -->
<style>
.title {
  color: red;
}

button {
  padding: 10px 15px;
  border-radius: 10px;
}
</style>启用 less 语法
如果想在 style 中使用 less 语法,需要先运行如下的命令安装 less 插件:
bash
npm install -D less之后,改造 SFC 组件的 <style> 标签,为其添加 lang="less" 属性,即可使用 less 语法编写样式:
less
<style lang="less">
// 定义 less 变量
@font-color: #ff0000;
@btn-padding: 10px 15px;

.title {
  // 使用 CSS 变量
  color: @font-color;
  // 嵌套选择器
  span {
    // 使用 less 的颜色函数
    color: darken(@font-color, 15%);
  }
}

button {
  // 使用 CSS 变量
  padding: @btn-padding;
  border-radius: 10px;
}
</style>SFC 基本用法总结
- 后缀名为
.vue的组件,叫做 SFC 单文件组件; - 每个单文件组件,由
template、script和style三部分构成; - 每个 SFC 中必须有一个
template或script标签,而style标签是可选的;
组件的概念
当学会了 SFC 的基本用法之后,我们再来补充一下“组件”的概念。
组件是对 UI 结构的封装和复用。例如:一个项目的多个页面中都需要用到轮播图,为了实现轮播图的结构和功能的复用,我们可以把轮播图功能封装为独立的、可复用的组件。
好处
一次封装,多次使用(不必每次用到轮播图的时候都从 0 到 1 实现一遍)。
在实际应用中,组件常常被组织成层层嵌套的树状结构:
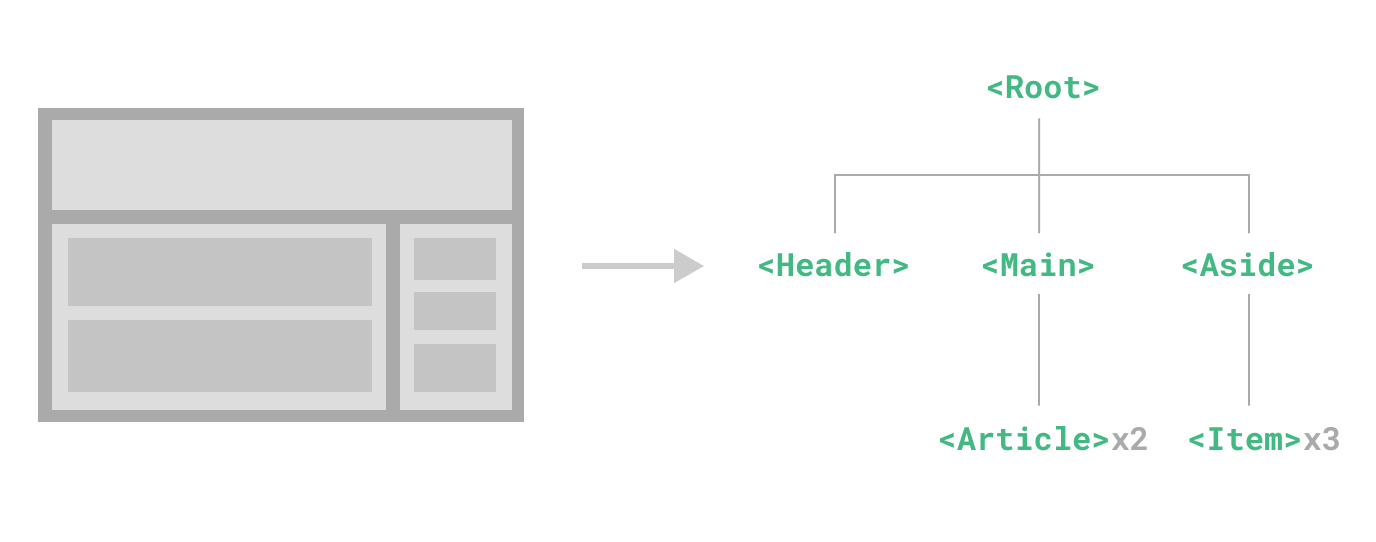
我们可以看到:
- 组件是构成页面布局的基础元素,实际的 HTML 标签都是封装到组件中的;
- 每个项目都需要一个根组件(Root 或 App)来承载其它的布局组件;
TIP
在项目的入口模块 main.js 中,传递给 createApp() 函数的那个组件,就是项目中的根组件。
根组件会被渲染(填充)到 index.html 页面的 id 为 app 的 div 中。
组件的基础用法
在根组件之中渲染其它组件
TIP
- 项目中唯一的根组件,一般都直接放到
src/目录下,命名为App.vue或Root.vue; - 项目中的其它组件,一般都放在
src/components/目录下;
例如:若要把 counter 功能抽离为独立的 Counter.vue 组件,首先,在 src/components/ 目录下新建 Counter.vue 组件:
vue
<script setup>
import { ref } from 'vue'
const count = ref(0)
</script>

<template>
  <h1 class="title">count 的值是:{{ count }}</h1>
  <button @click="count++">+1</button>
</template>

<style>
.title {
  color: red;
}

button {
  padding: 10px 15px;
  border-radius: 6px;
}
</style>清空 App.vue 组件,并按照如下两个步骤导入并使用 Counter 组件:
vue
<script setup>
// 1. 导入 Counter 组件
import Counter from './components/Counter.vue'
</script>

<template>
  <!-- 2. 以标签的形式,使用导入的 Counter 组件 -->
  <Counter />
</template>注意
由于 HTML 的标签名都是小写,因此为了和 HTML 的标签进行区分,建议使用大驼峰的形式定义和使用 Vue 的组件名。
实现页面基础布局
美化 App 根组件
清空 App 根组件,为其设置灰色的背景颜色,再让 App 根组件撑满浏览器:
vue
<template>
  <div class="root"></div>
</template>

<style>
html,
body,
#app {
  width: 100%;
  height: 100%;
  margin: 0;
}

.root {
  height: 100%;
  width: 100%;
  background-color: gray;
}
</style>由于 html、body、#app 对应的元素不属于当前的 App 组件,因此建议大家把它们的样式,封装到 src/assets/main.css 全局样式表中:
css
html,
body,
#app {
  width: 100%;
  height: 100%;
  margin: 0;
}并在 src/main.js 中导入全局样式表:
js
import { createApp } from 'vue'
import App from './App.vue'
// 导入全局样式
import './assets/main.css'

const app = createApp(App)
app.mount('#app')最后 App 组件的结构和样式如下:
vue
<template>
  <div class="root"></div>
</template>

<style>
.root {
  height: 100%;
  width: 100%;
  background-color: gray;
}
</style>TIP
一般情况下,组件中的 style 标签中只定义当前组件要用到的样式,全局的样式建议封装到 src/assets/main.css 全局样式表中。
创建并使用 Header 组件
在 src/components/ 目录下新建 Header.vue 组件:
vue
<template>
  <div class="header"></div>
</template>

<style>
.header {
  height: 100px;
  width: 100%;
  background-color: lightblue;
}
</style>在 src/App.vue 组件中导入并使用 Header 组件:
vue
<script setup>
// 1. 导入 Header 组件
import Header from './components/Header.vue'
</script>

<template>
  <div class="root">
    <!-- 2. 使用 Header 组件 -->
    <Header />
  </div>
</template>

<style>
.root {
  height: 100%;
  width: 100%;
  background-color: gray;
  /* 3. 优化样式 */
  padding: 10px;
  box-sizing: border-box;
}
</style>创建并使用 Main 和 Aside 组件
在 src/components/ 目录下,创建 Main.vue 组件:
vue
<template>
  <div class="main"></div>
</template>

<style>
.main {
  flex: 3;
  background-color: lightgreen;
}
</style>在 src/components/ 目录下,创建 Aside.vue 组件:
vue
<template>
  <div class="aside"></div>
</template>

<style>
.aside {
  width: 20%;
  flex: 1;
  background-color: orange;
}
</style>最后,在 App.vue 组件中,导入并使用 Main 和 Aside 组件:
vue
<script setup>
import Header from './components/Header.vue'
// 导入 Main 和 Aside 组件
import Main from './components/Main.vue'
import Aside from './components/Aside.vue'
</script>

<template>
  <div class="root">
    <Header />

    <!-- 页面主体区域 -->
    <div class="content">
      <!-- 主体 -->
      <Main />
      <!-- 侧边栏 -->
      <Aside />
    </div>
  </div>
</template>

<style>
.root {
  height: 100%;
  width: 100%;
  background-color: gray;
  padding: 10px;
  box-sizing: border-box;

  /* flex 布局 */
  display: flex;
  flex-direction: column;
  gap: 10px;
}

.content {
  /* 主体区域的 flex 布局 */
  display: flex;
  gap: 10px;
  flex: 1;
}
</style>循环渲染 AsideItem 组件
在 src/components/ 目录下,新建 AsideItem.vue 组件:
vue
<template>
  <div class="aside-item"></div>
</template>

<style>
.aside-item {
  height: 100px;
  width: 100%;
  background-color: lightgray;
}
</style>在 Aside 组件中,导入并使用 AsideItem 组件:
vue
<script setup>
// 导入 AsideItem 组件
import AsideItem from './AsideItem.vue'
</script>

<template>
  <div class="aside">
    <!-- 循环渲染3个侧边栏的 Item 项 -->
    <AsideItem v-for="item in 3" />
  </div>
</template>

<style>
.aside {
  width: 20%;
  flex: 1;
  background-color: orange;

  /* 3. 美化样式 */
  padding: 10px;
  display: flex;
  flex-direction: column;
  gap: 10px;
}
</style>循环渲染 Article 组件
在 src/components/ 目录下,新建 Article.vue 组件:
vue
<template>
  <div class="article"></div>
</template>

<style>
.article {
  background-color: lightgray;
  height: 155px;
}
</style>在 Main 组件中,导入并使用 Article 组件:
vue
<script setup>
// 1. 导入 Article 组件
import Article from './Article.vue'
</script>

<template>
  <div class="main">
    <!-- 2. 循环渲染2个 Article 组件 -->
    <Article v-for="item in 2" />
  </div>
</template>

<style>
.main {
  flex: 3;
  background-color: lightgreen;

  /* 3. 美化样式 */
  padding: 10px;
  display: flex;
  flex-direction: column;
  gap: 10px;
}
</style>组件之间的关系
组件之间的关系分为以下 3 种:
父子关系:直接嵌套的组件称为父子关系,例如 Root 组件是 Header/Main/Aside 的父组件;反之,Header/Main/Aside 是 Root 的子组件。
后代关系:间接嵌套的组件称为后代关系,Root 和 Article/Item 组件之间是间接嵌套的后代关系。
兄弟关系:若两个(多个)组件直接属于同一个父组件,则这两个组件称为兄弟关系,例如 Header/Main/Aside 这三个组件是兄弟关系。
注意
Article 和 Item 组件不是兄弟关系,因为它们并不直接属于同一个父组件。
组件的注册
一个 Vue 组件在使用前需要先被“注册”,这样 Vue 才能在渲染模板时找到其对应的实现。组件注册有两种方式:全局注册和局部注册。
全局注册
我们可以使用 Vue 应用实例的 .component() 方法,让组件在当前 Vue 应用中全局可用。语法格式如下:
js
// 1. 导入需要被全局注册的组件
import MyComponent from './App.vue'
// 2. 调用 app 的 .component() 方法注册全局组件,
//    第一个参数,是注册完成之后的“标签名”,
//    第二个参数,是步骤1导入的、需要被注册的那个组件
app.component('MyComponent', MyComponent)TIP
全局注册的组件,可以在任何组件内直接以标签的形式使用,不必每次单独导入。
全局注册自定义的 Button 组件
在 src/components/ 目录下,新建 Button.vue 组件:
vue
<template>
  <button>自定义的按钮</button>
</template>

<style lang="less">
button {
  @bg-color: #409eff;
  padding: 8px 15px;
  border: none;
  border-radius: 4px;
  background-color: @bg-color;
  color: #fff;
  transition: background-color 0.1s;

  &:hover {
    background-color: darken(@bg-color, 20%);
    cursor: pointer;
    transition: background-color 0.1s;
  }

  &:active {
    background-color: lighten(@bg-color, 5%);
    cursor: pointer;
    transition: background-color 0.1s;
  }
}
</style>在 src/main.js 入口文件中,导入并全局注册 Button 按钮组件:
js
import { createApp } from 'vue'
import App from './App.vue'
import './assets/main.css'
// 导入需要被区全局注册的组件
import Button from './components/Button.vue'

const app = createApp(App)
// 调用 app.component() 函数,注册全局组件
app.component('MyButton', Button)

app.mount('#app')温馨提示
app.component() 方法的调用,必须在 createApp() 之后,否则 app 实例还没有被创建!
局部注册
全局注册虽然很方便,但有以下两个问题:
全局注册组件存在的问题
- 全局注册,但并没有被使用的组件无法在生产打包时被自动移除 (也叫“tree-shaking”)。如果你全局注册了一个组件,即使它并没有被实际使用,它仍然会出现在打包后的 js 文件中。
- 全局注册在大型项目中使组件的依赖关系变得不那么明确。在父组件中使用子组件时,不太容易定位子组件的实现。和使用过多的全局变量一样,这可能会影响应用长期的可维护性。
相比之下,局部注册的组件需要在使用它的父组件中显式导入,并且只能在该父组件中使用。它的优点是使组件之间的依赖关系更加明确,并且对 tree-shaking 更加友好。
在使用 <script setup> 的单文件组件中,导入的组件可以直接在模板中使用:
vue
<script setup>
import ComponentA from './ComponentA.vue'
</script>

<template>
  <ComponentA />
</template>组件名格式
再来强调一遍,Vue 官方推荐使用大驼峰(PascalCase)命名法来注册组件的标签名称。这是因为:
- 大驼峰命名法是合法的 JavaScript 标识符,这使得在 js 中导入和注册组件都很方便,同时代码编辑器能够提供较好的代码自动补全功能。
- 大驼峰命名法能更明显地表明了这是一个 Vue 组件,而不是原生 HTML 元素。
因此,今后在 SFC 中导入和使用组件时,推荐大家都采用大驼峰命名法。
SFC 中的样式
演示样式冲突的问题
默认情况下,在组件中声明的 <style> 属于全局样式,这些样式除了会影响组件自身的元素,还会影响到其它组件中的元素。因为这些组件经过 Vue 编译之后,都会被呈现在唯一的 index.html 页面中,所以很容易出现样式冲突的问题。
例如:在 src/components/AsideItem.vue 组件中添加一个 <button> 标签,刷新浏览器后我们发现,这个 button 的样式被污染了。污染的来源是全局注册的 <MyButton> 组件:
vue
<template>
  <div class="aside-item">
    <button>无辜的 button</button>
  </div>
</template>

<style>
.aside-item {
  height: 100px;
  width: 100%;
  background-color: lightgray;
}
</style>解决样式冲突的问题
解决样式冲突的方式有很多种,在这里,我们使用自定义属性 + 属性选择器的方式来解决组件之间样式冲突的问题。实现思路如下:
- 为每个 SFC 组件分配唯一的自定义属性名
- 把自定义的属性名,添加给当前组件的每一个元素
- 给当前组件的样式选择器,添加一个交集的属性选择器
例如,给 src/components/Button.vue 指定一个自定义属性 data-v-001,然后把 Button 组件中的模板结构和样式修改如下:
vue
<template>
  <!-- 注意:每个元素身上都添加了一个 data-v-* 的自定义属性 -->
  <button data-v-001>自定义的按钮</button>
  <h3 class="title" data-v-001>这是 MyButton 中的标题</h3>
</template>

<style lang="less">
/* 注意:在定义样式选择器的时候,追加一个“交集的属性选择器” */
/*       从而让当前组件中的样式,只在当前组件内生效,不会污染到其它组件 */
button[data-v-001] {
  @bg-color: #409eff;
  padding: 8px 15px;
  border: none;
  border-radius: 4px;
  background-color: @bg-color;
  color: #fff;
  transition: background-color 0.1s;

  &:hover {
    background-color: darken(@bg-color, 20%);
    cursor: pointer;
    transition: background-color 0.1s;
  }

  &:active {
    background-color: lighten(@bg-color, 5%);
    cursor: pointer;
    transition: background-color 0.1s;
  }
}

/* 注意:在定义样式选择器的时候,追加一个“交集的属性选择器” */
/*       从而让当前组件中的样式,只在当前组件内生效,不会污染到其它组件 */
.title[data-v-001] {
  color: red;
}
</style>这样,就成功的解决了组件之间的样式冲突问题。因为每个组件中的样式,都有添加了唯一的属性选择器,从而保证了当前组件的样式只会影响自身的元素。
其实 Vue 为了简化用户的编码复杂度,为 <style> 提供了 scoped 选项。Vue 在编译 SFC 模板的时候,如果发现 <style scoped> 的写法,就会自动给当前组件生成一个唯一的 data-v-* 属性选择器,并自动把属性选择器添加到每个元素和每个 CSS 选择器上。
最佳实践
今后再创建 SFC 组件的时候,一定要为每个组件的 <style> 添加 scoped 选项,从而防止组件之间的样式冲突问题!
根元素与 scoped *
在 Vue3 中的 SFC 组件内,<template> 区域允许存在多个根元素,同时,也支持 Vue2 中的唯一根元素的写法。当父子组件同时应用 scoped 时:
- 如果子组件的
<template>中存在多个根元素,不会把父组件的data-v-*添加给子组件的根元素。 - 如果子组件的
<template>中只有唯一的根元素,则会把父组件的data-v-*添加给子组件的根元素。
TIP
请记住这个特性,因为它是导致 Vue 路由过渡动画产生 Bug 的本质原因。
深度选择器
当父组件开启了 <style> 标签的 scoped 选项之后,默认情况下,父组件中编写的样式将无法影响到子组件中的“非根元素”,这完全符合防止组件之间样式冲突的需求。
但是,这也产生了一个负面的作用:在不改动子组件代码的情况下,父组件中无法微调子组件中的任何样式(子组件的根元素除外)!
解决方案很简单,使用 :deep() 这个伪类,把子组件的选择器包裹起来即可。语法格式如下:
css
/* 父组件的 style 区域 */
:deep(子组件的选择器) {
  /* 样式 */
}例如:在 Header 组件中,更改 Button 按钮的背景颜色:
vue
<template>
  <div class="header">
    <MyButton />
  </div>
</template>

<style scoped>
.header {
  height: 100px;
  width: 100%;
  background-color: lightblue;
}

/* 把子组件的选择器,使用 :deep() 包裹起来 */
:deep(button) {
  background-color: blueviolet !important;
}
</style>最终生成的选择器是:
css
/* 注意 button 前面的“空格” */
[data-v-c970699f] button {
  background-color: blueviolet !important;
}如果在 Header 父组件中没有使用 :deep() 伪类,则最终生成的选择器是 button[data-v-c970699f],此时无法选中子组件中的 button 按钮。因为子组件的 data-v 值是 data-v-3c9d0845。
CSS 中的 v-bind()
SFC 中的 <style> 标签支持使用 v-bind() 这个 CSS 函数将响应式数据绑定为 CSS 属性的值。例如把响应式数据 count 绑定为 h3 元素的 font-size 值。
绑定行内的 style 样式
在不使用 CSS 的 v-bind() 函数之前,需要按照如下的方式实现功能:
vue
<script setup>
import { ref } from 'vue'
// 定义响应式数据
const size = ref(16)
</script>

<template>
  <button @click="size++">自定义的按钮</button>
  <!-- 绑定行内的 style 样式对象 -->
  <h3 class="title" :style="{ fontSize: size + 'px' }">这是 MyButton 中的标题</h3>
</template>

<style lang="less" scoped>
button {
  @bg-color: #409eff;
  padding: 8px 15px;
  border: none;
  border-radius: 4px;
  background-color: @bg-color;
  color: #fff;
  transition: background-color 0.1s;

  &:hover {
    background-color: darken(@bg-color, 20%);
    cursor: pointer;
    transition: background-color 0.1s;
  }

  &:active {
    background-color: lighten(@bg-color, 5%);
    cursor: pointer;
    transition: background-color 0.1s;
  }
}

.title {
  color: red;
}
</style>使用 CSS 中的 v-bind() 函数
在使用了 CSS 的 v-bind() 函数之后,可以按照如下的方式实现功能:
vue
<script setup>
import { ref } from 'vue'
// 定义响应式数据
const size = ref(16)
</script>

<template>
  <button @click="size++">自定义的按钮</button>
  <h3 class="title">这是 MyButton 中的标题</h3>
</template>

<style lang="less" scoped>
button {
  @bg-color: #409eff;
  padding: 8px 15px;
  border: none;
  border-radius: 4px;
  background-color: @bg-color;
  color: #fff;
  transition: background-color 0.1s;

  &:hover {
    background-color: darken(@bg-color, 20%);
    cursor: pointer;
    transition: background-color 0.1s;
  }

  &:active {
    background-color: lighten(@bg-color, 5%);
    cursor: pointer;
    transition: background-color 0.1s;
  }
}

.title {
  color: red;
  font-size: v-bind("size + 'px'");
}
</style>注意
CSS 的 v-bind() 函数中支持 JavaScript 表达式(需要用引号包裹起来)。
原理
- 实际的值会被编译成哈希化的 CSS 自定义属性,因此 CSS 本身仍然是静态的。
- 自定义属性会通过内联样式的方式应用到组件的根元素上,并且在源值变更的时候响应式地更新。
选项式 API & 组合式 API *
在 Vue3 的 SFC 单文件组件中,同时支持使用选项式 API 和组合式 API 来封装组件的 JS 逻辑。
选项式 API
选项式 API 是从 Vue2 就存在的特性,为了让 Vue2 的用户友好地迁移到 Vue3,因此 Vue3 中依然保留了选项式 API 的用法。选项式 API 的语法如下:
vue
<template></template>

<script>
// 在导出的这个对象中,提供了一系列的内置选项(选项名称是固定写法),
// 用来声明组件的 数据、方法、计算属性、侦听器 等
export default {
  name: '',
  data() {},
  methods: {},
  computed: {},
  watch: {},
  props: {},
  components: {},
  directives: {},
  emits: {}
}
</script>

<style></style>在选项式 API 中,不同的内容要分别放到不同的选项下。例如:
数据要放到 data 选项中
方法要放到 methods 选项中
侦听器要放到 watch 选项中
计算属性要放到 computed 选项中
其它选项不再逐一说明...优势
这种内置的选项能够简化初学者的上手难度,这也是为什么 Vue2 能够迅速发展为前端圈的流行框架的原因之一。
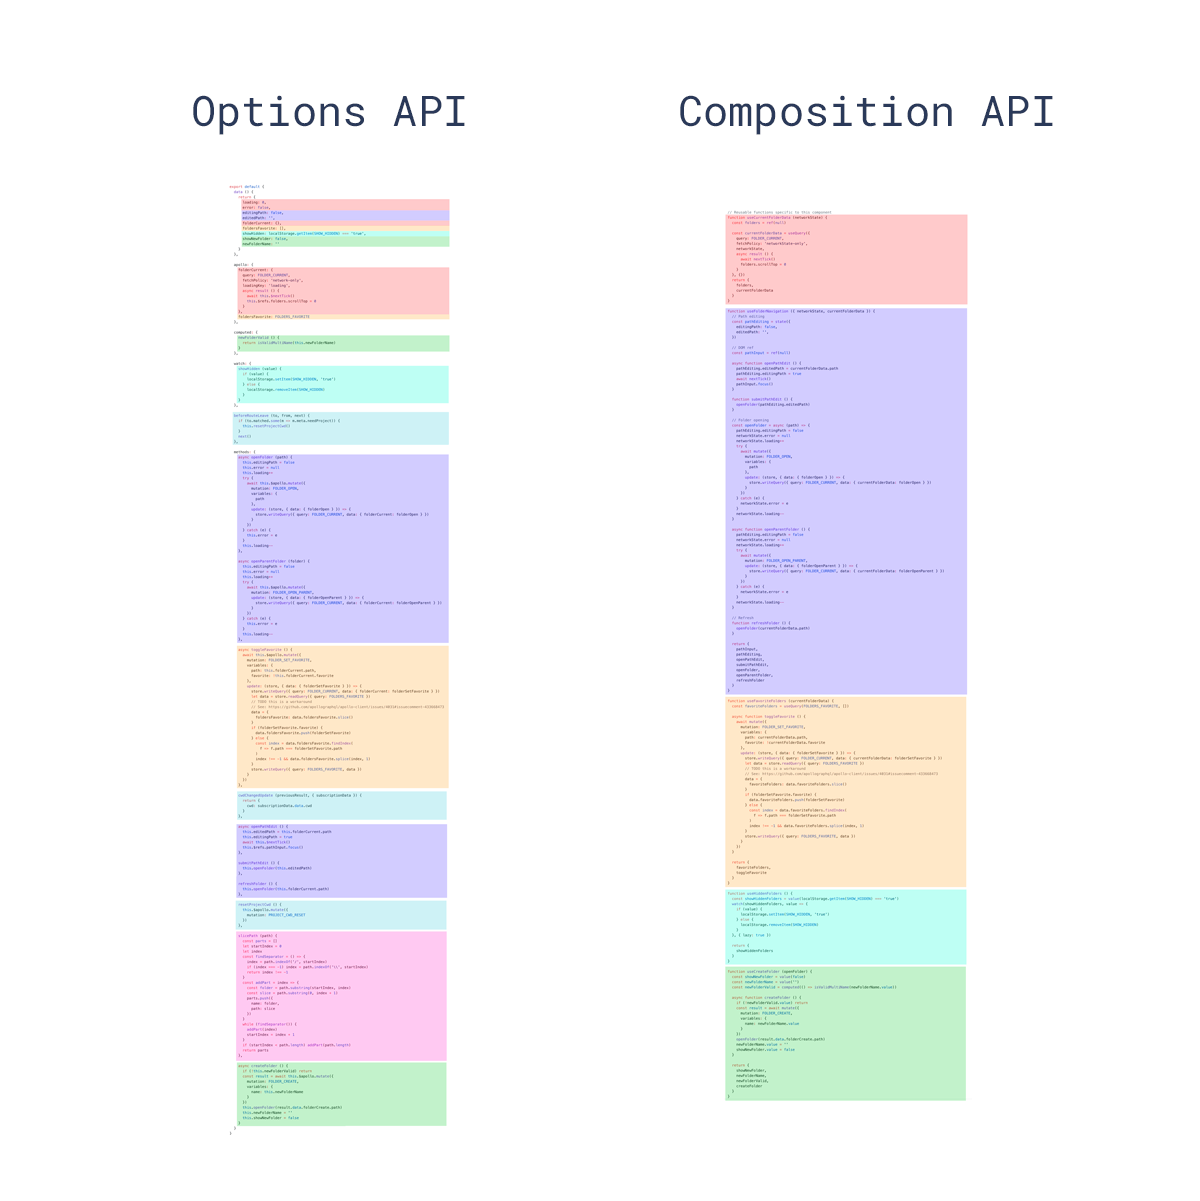
这种内置的选项式 API 也带来了一些负面的影响:一个完整的功能被支离破碎的拆分到了不同的选项中,难以在多个组件之间复用,同时也增大了维护的难度。 这个问题在大型的复杂项目中尤为突出。
请参考如下的截图理解这个问题(颜色相同的代码块表示一个完整功能的组成部分):
快速体验选项式 API 的用法
下面的代码演示了如何基于选项式 API 实现“count 自增”的功能:
vue
<template>
  <h1>快速体验选项式 API 的用法</h1>
  <hr />

  <h3>count 的值是:{{ count }}</h3>
  <p>count 乘 2 的值是:{{ countPlus2 }}</p>
  <button @click="add">+1</button>
</template>

<script>
export default {
  data() {
    // 数据的选项
    return {
      count: 0
    }
  },
  methods: {
    // 方法的选项
    add() {
      this.count++
    }
  },
  computed: {
    // 计算属性的选项
    countPlus2() {
      return this.count * 2
    }
  }
}
</script>如果,我们想要再添加一个“设置网页背景色”的功能,需要把刚才的代码修改如下:
vue
<template>
  <h1>快速体验选项式 API 的用法</h1>
  <hr />

  <h3>count 的值是:{{ count }}</h3>
  <p>count 乘 2 的值是:{{ countPlus2 }}</p>
  <button @click="add">+1</button>

  <hr />

  <input type="color" v-model="bgColor" />
  <button @click="setBgColor">设置网页的背景颜色</button>
</template>

<script>
export default {
  data() {
    // 数据的选项
    return {
      count: 0, // 计数器的数据
      bgColor: '#ffffff' // 背景色的数据
    }
  },
  methods: {
    // 方法的选项
    add() {
      // 计数器的处理函数
      this.count++
    },
    setBgColor() {
      // 背景色的处理函数
      window.document.body.style.backgroundColor = this.bgColor
    }
  },
  computed: {
    // 计算属性的选项
    countPlus2() {
      return this.count * 2
    }
  }
}
</script>TIP
选项式 API 会导致完整的功能被拆分到不同的选项中,增加了维护的成本,而且降低了代码的复用性。
组合式 API
组合式 API 是 Vue3 中特有的新功能,它突破了选项式 API 的限制,能够让程序员自由组合想要实现的功能。
组合式 API 的本质:函数式编程,把定义响应式数据、侦听器、计算属性等功能封装为可独立调用的 API 函数。
例如我们之前所学的、从 Vue 中按需导入的 ref()、reactive()、computed()、watch()、watchEffect() 等这些函数,都是 Vue3 中新增的组合式 API。
使用组合式 API 改写刚才的案例
我们可以把刚才的案例,改写成下面的代码:
vue
<template>
  <h1>快速体验选项式 API 的用法</h1>
  <hr />

  <h3>count 的值是:{{ count }}</h3>
  <p>count 乘 2 的值是:{{ countPlus2 }}</p>
  <button @click="add">+1</button>

  <hr />

  <input type="color" v-model="bgColor" />
  <button @click="setBgColor">设置网页的背景颜色</button>
</template>

<script setup>
import { ref, computed } from 'vue'

// 计数器的功能
const count = ref(0)
const countPlus2 = computed(() => count.value * 2)
const add = () => count.value++

// 改变网页背景色的功能
const bgColor = ref('#ffffff')
const setBgColor = () => (document.body.style.backgroundColor = bgColor.value)
</script>TIP
改写成组合式 API 的写法之后,我们发现代码更加聚合,也减少了不必要的样板代码。
封装自定义 hook
组合式 API 的另一个好处是:可以提高代码的复用性。只需要把通用的逻辑代码封装到 use 开头的函数中,即可实现代码的复用。这种以 use 开头的自定义函数叫做“自定义 hook”。
例如,把“改变网页背景色”的功能和“计数器”的功能,封装到 src/hooks/index.js 模块中:
js
import { ref, computed } from 'vue'

// 把设置网页背景色的功能封装为可复用的 hook
// 注意:自定义 hook 必须以 useXXX 开头
export const useBackgroundColor = (initColor = '#ffffff') => {
  const bgColor = ref(initColor)
  const setBgColor = () => (document.body.style.backgroundColor = bgColor.value)

  return [bgColor, setBgColor]
}

// 把计数器功能封装为可复用的 hook
export const useCounter = (initCount = 0) => {
  const count = ref(initCount)
  const countPlus2 = computed(() => count.value * 2)
  const add = () => (count.value += 1)

  return [count, countPlus2, add]
}今后,在任何 SFC 组件中凡是需要用到这两个功能,只需导入对应的 hook 即可:
vue
<template>
  <h1>快速体验选项式 API 的用法</h1>
  <hr />

  <h3>count 的值是:{{ count }}</h3>
  <p>count 乘 2 的值是:{{ countPlus2 }}</p>
  <button @click="add">+1</button>

  <hr />

  <input type="color" v-model="bgColor" />
  <button @click="setBgColor">设置网页的背景颜色</button>
</template>

<script setup>
// import { ref, computed } from 'vue'
import { useBackgroundColor, useCounter } from './hooks'

// 计数器的功能
// const count = ref(0)
// const countPlus2 = computed(() => count.value * 2)
// const add = () => count.value++
const [count, countPlus2, add] = useCounter()

// 改变网页背景色的功能
// const bgColor = ref('#ffffff')
// const setBgColor = () => (document.body.style.backgroundColor = bgColor.value)
const [bgColor, setBgColor] = useBackgroundColor()
</script>总结
在今后的开发中,推荐大家优先使用组合式 API 进行 Vue3 的开发,选项式 API 了解即可。