

Appearance
自定义事件
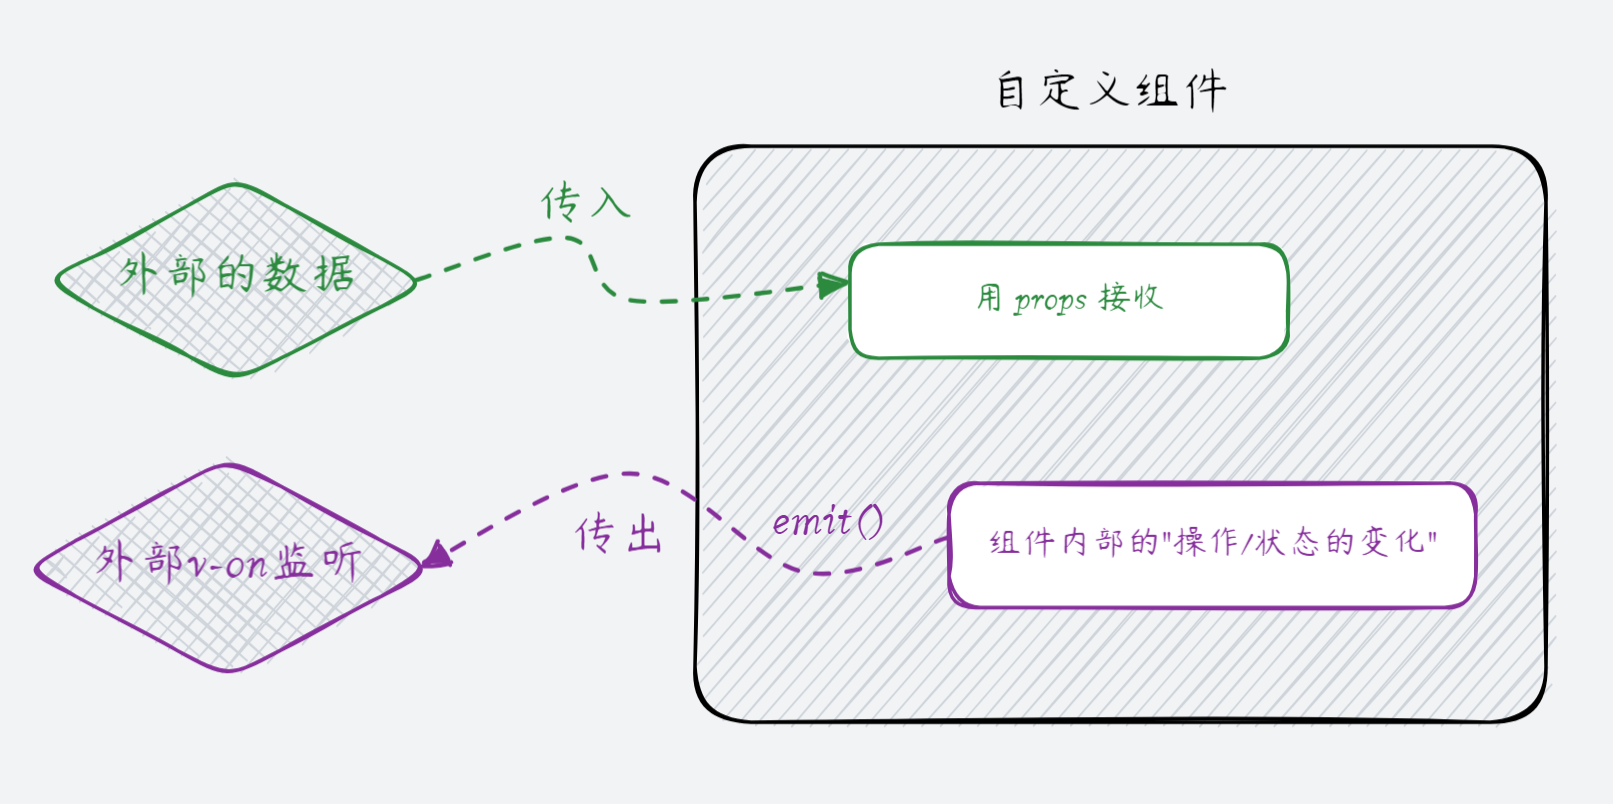
在封装自定义组件时,为了保证组件的通用性,我们需要着重考虑组件的可交互性。其中,
- Props 允许自定义组件接收外部传入的数据;
- 而自定义事件允许自定义组件把内部的"操作/状态的变化"传出供外部使用;
模板中的 $emit()
声明自定义事件
在 SFC 的模板中,Vue 内置了 $emit() 函数,用来触发自定义事件:
vue
<!-- CustomEvent.vue 组件 -->
<template>
  <h3>count 值是:{{ count }}</h3>
  <button @click="count++">+1</button>
  <button @click="$emit('countChange')">触发自定义事件</button>
</template>不过在这之前,必须先在 <script setup> 中调用 Vue 内置的 defineEmits() 宏函数,来声明当前组件所持有的自定义事件名:
vue
<script setup>
// 声明自定义事件的名称
defineEmits(['countChange'])

import { ref } from 'vue'
const count = ref(0)
</script>绑定自定义事件的处理器
在使用自定义组件时,可通过 v-on 指令(简写 @)绑定自定义事件的处理器:
vue
<script setup>
import CustomEvent from './components/CustomEvent.vue'

// 自定义事件的处理器
const countChangeHandler = () => {
  console.log('调用了父组件中的 countChangeHandler 处理函数')
}
</script>

<template>
  <h1>自定义事件</h1>
  <hr />
  <!-- 使用 v-on 绑定自定义事件的处理器 -->
  <CustomEvent @count-change="countChangeHandler" />
</template>传参
在模板中调用 $emit() 的时候,可通过第 2 个参数携带数据,语法格式如下:
js
$emit('事件名', 数据1, 数据2, ...)例如,在子组件 CustomEvent.vue 的模板中,调用 $emit() 并传参:
vue
<script setup>
defineEmits(['countChange'])
import { ref } from 'vue'
const count = ref(0)
</script>

<template>
  <h3>count 值是:{{ count }}</h3>
  <button @click="count++">+1</button>
  <!-- 触发自定义事件时,把最新的 count 值传出 -->
  <button @click="$emit('countChange', count)">触发自定义事件</button>
</template>在父组件中,可通过事件处理器的形参接收到子组件传出的数据:
vue
<script setup>
import CustomEvent from './components/CustomEvent.vue'
import { ref } from 'vue'
// 1. 定义响应式数据
const countFromSon = ref(0)

// 2.1 通过形参接收子组件传出的数据
const countChangeHandler = (value) => {
  console.log('调用了父组件中的 countChangeHandler 处理函数', value)
  // 2.2 再把数据转存到 countFromSon 中
  countFromSon.value = value
}
</script>

<template>
  <h1>自定义事件</h1>
  <!-- 3. 把子组件传出的数据,渲染到父组件的模板中 -->
  <p>子组件传出的数据是:{{ countFromSon }}</p>
  <hr />
  <CustomEvent @count-change="countChangeHandler" />
</template>注意
$emit() 支持携带多个数据。相应的,在绑定自定义事件处理器时,也能够接收到 $emit() 传出的多个数据。
<script setup> 中的 defineEmit()
在 SFC 的模板中可使用 $emit() 触发自定义事件,而在 <script setup> 中是访问不到 $emit() 函数的。
为此,在调用 defineEmit() 宏函数后,它返回一个等同于 $emit() 方法的 emit() 函数。通过此 emit() 函数可在 <script setup> 中触发自定义事件。语法格式如下:
vue
<script setup>
const emit = defineEmits(['countChange'])

// 通过返回的 emit 函数,来触发指定的自定义事件
emit('countChange')
</script>示例代码如下:
vue
<script setup>
// 1. 接收 defineEmits 的返回值,得到 emit() 函数
const emit = defineEmits(['countChange'])
import { ref } from 'vue'
const count = ref(0)

const add = () => {
  count.value++
  // 2. 在 <script setup> 中触发自定义事件,并携带数据(可携带多个数据)
  emit('countChange', count.value)
}
</script>

<template>
  <h3>count 值是:{{ count }}</h3>
  <button @click="add">+1</button>
</template>事件校验
在模板中调用 $emit() 或者在 <script setup> 中调用 emit() 触发自定义事件时,为了防止传入错误的参数,我们可以对事件添加校验:
js
const emit = defineEmits({
  // 如果值为 null,表示没有对 countChange 事件进行校验
  // countChange: null

  // 提供了校验函数,返回 true 表示校验通过;返回 false 表示校验不通过
  countChange: (value) => {
    if (typeof value !== 'number' || isNaN(value)) {
      return false // 校验不通过
    }
    return true // 校验通过
  }
})调用说明:
js
emit('countChange', 9) // 校验通过,因为传入了数字
emit('countChange', 'abc') // 校验不通过,因为传入的是字符串封装 NumberBox 组件
在网上购物时,购物车中经常会用到 NumberBox 组件,截图如下:

其主要功能如下:
- 外界可以通过 prop 传入初始数值;
- 组件内点击“+”和“-”可以修改数值;
- 组件内数值的变化,需要通过自定义事件向外传出;
实现 NumberBox 组件的基础布局
创建 NumberBox.vue 组件,并封装其基础布局和样式如下:
vue
<script setup></script>

<template>
  <button class="nb-button">-</button>
  <input type="input" class="nb-input" />
  <button class="nb-button">+</button>
</template>

<style scoped>
.nb-button {
  padding: 5px 10px;
}
.nb-input {
  width: 40px;
  padding: 5px 0;
  text-align: center;
  margin: 0 1px;
}
</style>封装初始值的 prop
在 NumberBox.vue 组件中,声明 initialValue prop,并把只读的 prop 值转存到响应式数据中,供模板进行使用:
vue
<script setup>
import { ref } from 'vue'

// 1. 声明 Props
const props = defineProps({
  initialValue: {
    type: Number,
    default: 0
  }
})

// 2. 把只读的 prop 值转存到响应式数据中
const count = ref(props.initialValue)
</script>

<template>
  <button class="nb-button">-</button>
  <!-- 3. 使用 v-model 指令进行双向数据绑定 -->
  <input type="input" class="nb-input" v-model="count" />
  <button class="nb-button">+</button>
</template>

<style scoped>
.nb-button {
  padding: 5px 10px;
}
.nb-input {
  width: 40px;
  padding: 5px 0;
  text-align: center;
  margin: 0 1px;
}
</style>在使用 NumberBox.vue 组件时,通过 prop 传入初始值:
html
<!-- 父组件 -->
<script setup>
  import NumberBox from './components2/NumberBox.vue'
  import { ref } from 'vue'

  const num = ref(1)
</script>

<template>
  <h1>自定义事件 --- {{ num }}</h1>
  <hr />
  <!-- 传入初始值 -->
  <NumberBox :initial-value="num" />
</template>实现数值的加减操作
改造 NumberBox.vue 组件,为加减按钮绑定 add 处理函数:
vue
<script setup>
import { ref } from 'vue'

const props = defineProps({
  initialValue: {
    type: Number,
    default: 0
  }
})

const count = ref(props.initialValue)
// 1. 封装数值加减的函数
const add = (step) => {
  // 边界值控制,商品的购买数量不能小于1
  if (count.value + step <= 0) return
  count.value += step
}
</script>

<template>
  <!-- 2. 为按钮绑定点击事件处理器 -->
  <button class="nb-button" @click="add(-1)">-</button>
  <input type="input" class="nb-input" v-model="count" />
  <button class="nb-button" @click="add(1)">+</button>
</template>

<style scoped>
.nb-button {
  padding: 5px 10px;
}
.nb-input {
  width: 40px;
  padding: 5px 0;
  text-align: center;
  margin: 0 1px;
}
</style>通过自定义事件把数值的变化传出
改造 NumberBox.vue 组件,声明自定义事件并监听 count 值的变化,调用 emit() 把变化后的新值传出:
vue
<script setup>
import { ref, watch } from 'vue'

const props = defineProps({
  initialValue: {
    type: Number,
    default: 0
  }
})

// 1. 声明自定义事件
const emit = defineEmits(['countChange'])

const count = ref(props.initialValue)
const add = (step) => {
  if (count.value + step <= 0) return
  count.value += step
}

// 2. 侦听 count 值的变化,并调用 emit() 触发自定义事件,同时传入需要携带的数据
watch(num, (newValue, oldValue) => {
  console.log('xxx', newValue, oldValue)
  newValue = parseInt(newValue)

  if (newValue <= 0 || isNaN(newValue)) {
    // 非法的边界情况
    num.value = parseInt(oldValue)
  } else {
    // 正确的情况
    emit('countChange', newValue)
  }
})
</script>

<template>
  <button class="nb-button" @click="add(-1)">-</button>
  <input type="input" class="nb-input" v-model="count" />
  <button class="nb-button" @click="add(1)">+</button>
</template>

<style scoped>
.nb-button {
  padding: 5px 10px;
}
.nb-input {
  width: 40px;
  padding: 5px 0;
  text-align: center;
  margin: 0 1px;
}
</style>在父组件中,通过 @count-change="" 绑定事件处理器,并把形参中获取到的新值转存起来,供模板使用:
vue
<script setup>
import NumberBox from './components2/NumberBox.vue'
import { ref } from 'vue'

const num = ref(1)

// 2. 在事件处理器中获取传出的值,并进行转存
const countChangeHandler = (val) => {
  num.value = val
}
</script>

<template>
  <h1>自定义事件 --- {{ num }}</h1>
  <hr />
  <!-- 1. 通过 @count-change 绑定事件处理器 -->
  <NumberBox :initial-value="num" @count-change="countChangeHandler" />
</template>