
Appearance
组件数据共享
组件之间的关系大体上分为:父子关系、兄弟关系、后代关系这 3 大类。如何巧妙灵活的实现不同关系的组件之间的数据共享,是我们接下来要学习的内容。
Props
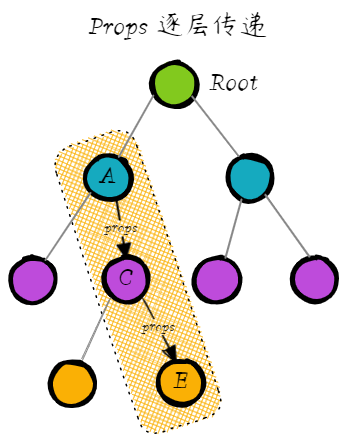
Props 适用于父组件向子组件共享数据,如果要实现多层嵌套组件之间的数据共享,则需要逐层向下传入 Props。
事件
自定义事件适用于子组件向父组件共享数据。
在子组件中触发自定义事件,在父组件中使用 v-on 绑定事件监听器,通过形参获取到子组件向上传出的数据。
依赖注入
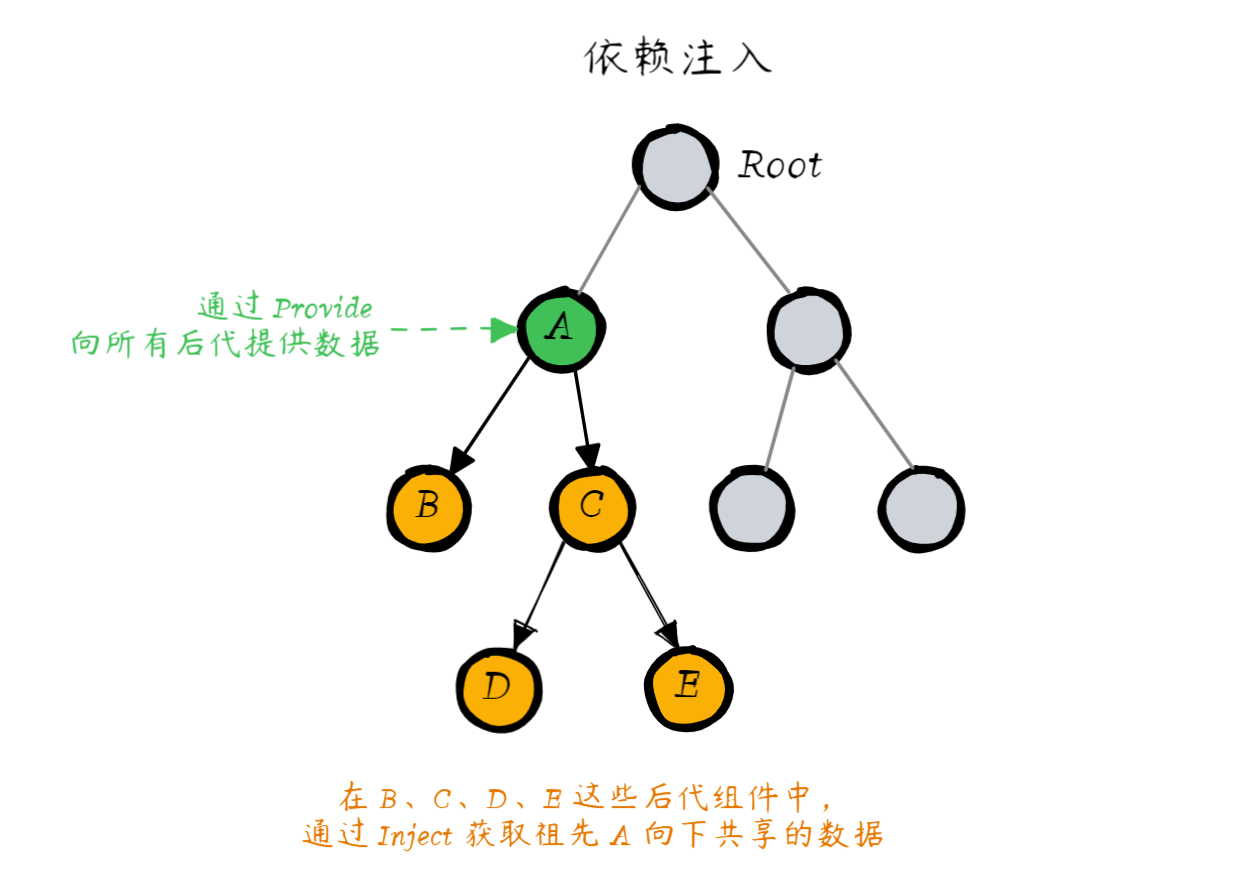
依赖注入适用于父组件向后代组件共享数据。
在父组件中使用 Provide 向后代提供数据,在后代组件中使用 Inject 获取注入的数据(也是单向的:自上而下的数据流动)。
Provide
provide() 函数是数据的提供者,用于向后代组件提供数据。语法格式如下:
vue
<script setup>
import { provide } from 'vue'

// 第一个参数是数据的名称,可以是字符串或者 Symbol
// 第二个参数是要提供给后代组件的数据,可以是任意类型的数据
provide('数据名', 要提供的数据)
</script>例如,在 App 组件中使用 provide 向下提供数据:
vue
<script setup>
import LevelA from './components2/LevelA.vue'
import { provide, reactive, computed } from 'vue'

// 响应式的数据对象
const rgb = reactive({
  r: 0,
  g: 0,
  b: 0
})
// 计算属性
const rgbColor = computed(() => `rgb(${rgb.r}, ${rgb.g}, ${rgb.b})`)
// 向下提供数据
provide('color', rgbColor)
</script>

<template>
  <h1>这是 App 组件 --- {{ rgbColor }}</h1>
  <!-- 双向数据绑定 -->
  <input type="number" v-model="rgb.r" />
  <input type="number" v-model="rgb.g" />
  <input type="number" v-model="rgb.b" />
  <hr />
  <LevelA />
</template>🚨 注意 🚨
一个组件可以多次使用 Provide 向下提供不同的数据。
Inject
在后代组件中,可以通过 inject() 注入祖先提供的数据。语法格式如下:
vue
<script setup>
import { inject } from 'vue'

const message = inject('数据名')
</script>例如,在 LevelC 组件中使用 inject 来注入数据:
vue
<script setup>
import { inject } from 'vue'
// 注入祖先向下共享的数据
const color = inject('color')
</script>

<template>
  <h6>这是 LevelC 组件 --- {{ color }}</h6>
  <div class="box"></div>
</template>

<style scoped>
.box {
  width: 200px;
  height: 200px;
  /* 绑定背景颜色 */
  background-color: v-bind('color');
}
</style>🚨 注意 🚨
一个组件可以多次调用 Inject 注入祖先提供的不同数据。
应用级别的 Provide
除了在一个组件中提供依赖,我们还可以在整个应用层面提供依赖:
js
import { createApp } from 'vue'

const app = createApp({})

app.provide(/* 注入名 */ 'message', /* 值 */ 'hello!')在应用级别提供的数据在该应用内的所有组件中都可以注入。这在你编写插件时会特别有用,因为插件一般都不会使用组件形式来提供值。
event-bus
event-bus 可以让我们轻松实现兄弟组件(不相干组件)之间的数据共享:
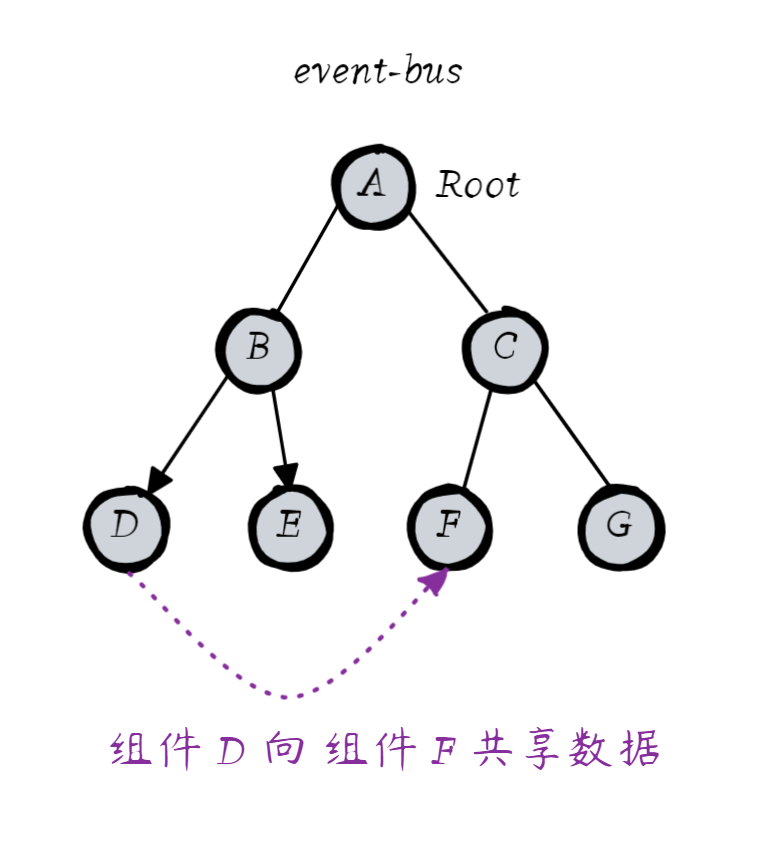
在 Vue 中我们推荐使用第三方插件 mitt 帮我们实现兄弟组件之间的数据共享,图示如下:
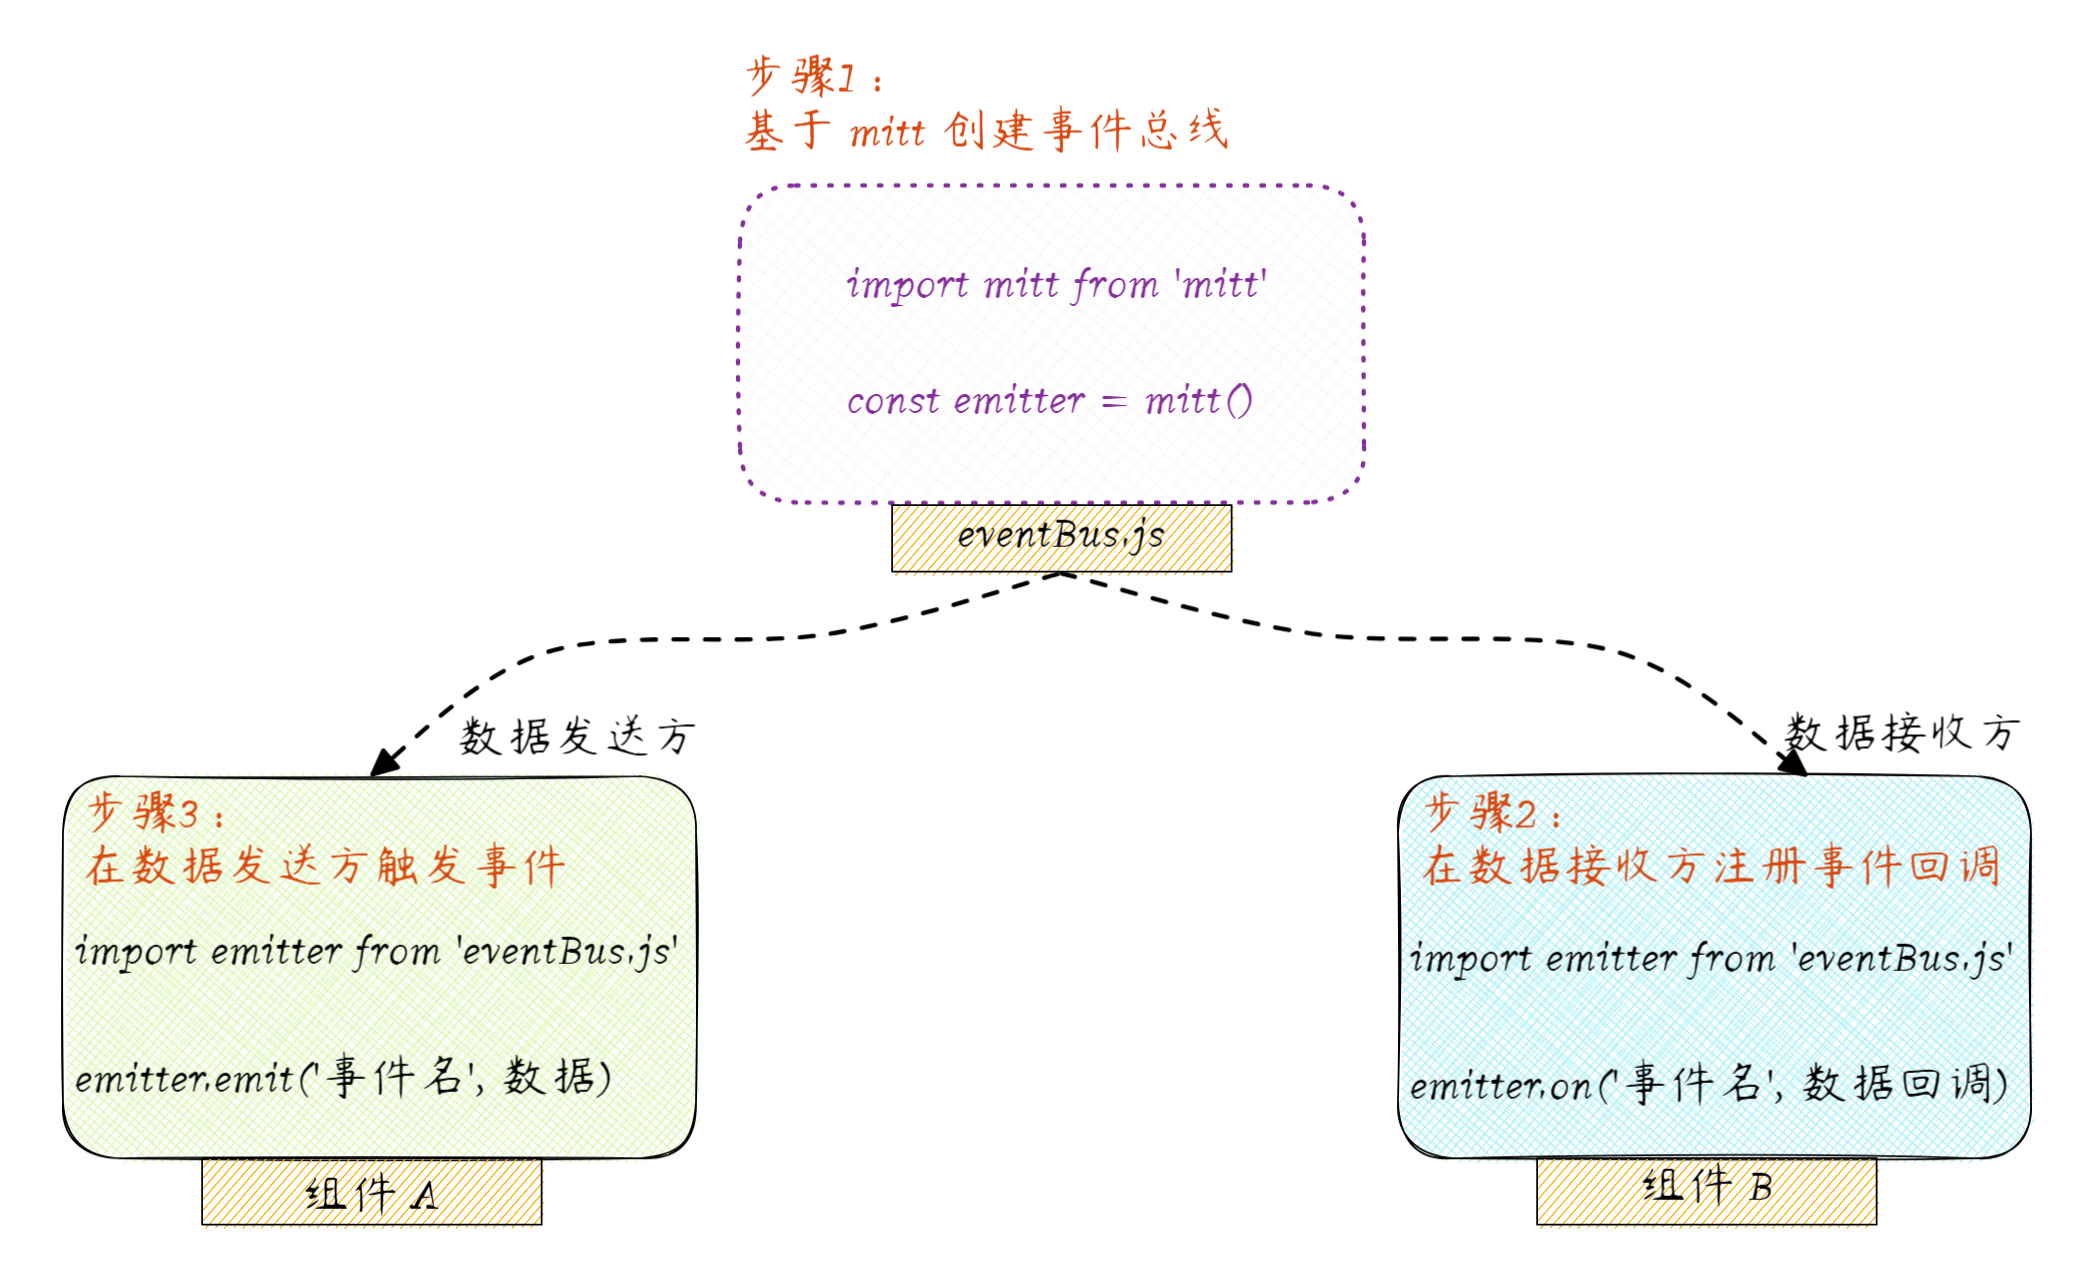
什么是 event-bus?
event-bus 是一种数据共享的模式的统称:凡是需要创建一个事件对象,并在接收方注册事件、在发送方触发事件的数据共享模式,都叫做“event-bus”。
实现组件的基础布局
Left.vue 组件:
vue
<script setup>
import { ref } from 'vue'

const count = ref(0)
const add = () => {
  count.value++
}
</script>

<template>
  <div class="box-left">
    <h5>数据发送方 --- {{ count }}</h5>
    <hr />

    <button @click="add">+</button>
  </div>
</template>

<style scoped>
h5 {
  margin: 0;
  padding: 0;
}
.box-left {
  background-color: orange;
  padding: 15px;
  box-sizing: border-box;
  min-height: 200px;
  flex: 1;
}
</style>Right.vue 组件:
vue
<script setup>
import { ref } from 'vue'

const num = ref(0)
</script>

<template>
  <div class="box-right">
    <h5>数据接收方 --- {{ num }}</h5>
    <hr />
  </div>
</template>

<style scoped>
h5 {
  margin: 0;
  padding: 0;
}
.box-right {
  background-color: lightblue;
  padding: 15px;
  box-sizing: border-box;
  min-height: 200px;
  flex: 1;
}
</style>Index.vue 组件:
vue
<script setup>
import Left from './Left.vue'
import Right from './Right.vue'
</script>

<template>
  <div class="app-container">
    <Left />
    <Right />
  </div>
</template>

<style scoped>
.app-container {
  display: flex;
  gap: 10px;
  padding: 10px;
}
</style>mitt 的基本用法
运行如下的命令,安装 mitt 依赖项:
bash
npm i mitt@3.0.1 -S在 src 目录下新建 eventBus.js 模块,并创建 emitter 实例:
js
import mitt from 'mitt'
export const emitter = mitt()在数据接收方 Right.vue 组件中,导入 emitter 并调用 emitter.on() 方法注册事件:
vue
<script setup>
import { ref, onMounted } from 'vue'
import { emitter } from '../eventBus.js'

const num = ref(0)

// 在 onMounted 中注册事件
onMounted(() => {
  emitter.on('share-number', (e) => {
    // 形参中的 e 就是发送过来的数据
    num.value = e
  })
})
</script>

<template>
  <div class="box-right">
    <h5>数据接收方 --- {{ num }}</h5>
    <hr />
  </div>
</template>

<style scoped>
h5 {
  margin: 0;
  padding: 0;
}
.box-right {
  background-color: lightblue;
  padding: 15px;
  box-sizing: border-box;
  min-height: 200px;
  flex: 1;
}
</style>在数据发送方 Left.vue 组件中,导入 emitter 并调用 emitter.emit() 方法触发事件:
vue
<script setup>
import { ref } from 'vue'
import { emitter } from '../eventBus.js'

const count = ref(0)
const add = () => {
  count.value++
  // 触发事件
  emitter.emit('share-number', count.value)
}
</script>

<template>
  <div class="box-left">
    <h5>数据发送方 --- {{ count }}</h5>
    <hr />

    <button @click="add">+</button>
  </div>
</template>

<style scoped>
h5 {
  margin: 0;
  padding: 0;
}
.box-left {
  background-color: orange;
  padding: 15px;
  box-sizing: border-box;
  min-height: 200px;
  flex: 1;
}
</style>在组件销毁时解绑事件
改造 Right.vue 组件,抽离公共的事件处理函数,并在 onBeforeUnmount 中调用 emitter.off() 解绑事件处理函数:
vue
<script setup>
import { ref, onMounted, onBeforeUnmount } from 'vue'
import { emitter } from '../eventBus.js'

const num = ref(0)

// 事件回调函数
const shareNumberHandler = (e) => {
  console.log(e)
  // 形参中的 e 就是发送过来的数据
  num.value = e
}

// 在 onMounted 中注册事件
onMounted(() => {
  emitter.on('share-number', shareNumberHandler)
})

// 在 onBeforeUnmount 中解绑事件
onBeforeUnmount(() => {
  emitter.off('share-number', shareNumberHandler)
})
</script>

<template>
  <div class="box-right">
    <h5>数据接收方 --- {{ num }}</h5>
    <hr />
  </div>
</template>

<style scoped>
h5 {
  margin: 0;
  padding: 0;
}
.box-right {
  background-color: lightblue;
  padding: 15px;
  box-sizing: border-box;
  min-height: 200px;
  flex: 1;
}
</style>为了演示效果,我们在 Index.vue 中通过布尔值 flag 控制 Right.vue 组件的展示和隐藏:
vue
<script setup>
import Left from './components2/Left.vue'
import Right from './components2/Right.vue'
import { ref } from 'vue'

// 基于 flag 控制 Right 组件的展示和隐藏
const flag = ref(true)
</script>

<template>
  <!-- 绑定按钮的 @click 点击事件处理器 -->
  <button @click="flag = !flag">toggle Right</button>
  <hr />
  <div class="app-container">
    <Left />
    <!-- 添加 v-if 指令 -->
    <Right v-if="flag" />
  </div>
</template>

<style scoped>
.app-container {
  display: flex;
  gap: 10px;
  padding: 10px;
}
</style>pinia*
pinia 是 Vue 官方出品的、用于实现全局状态管理的方案。它的作用如图所示:
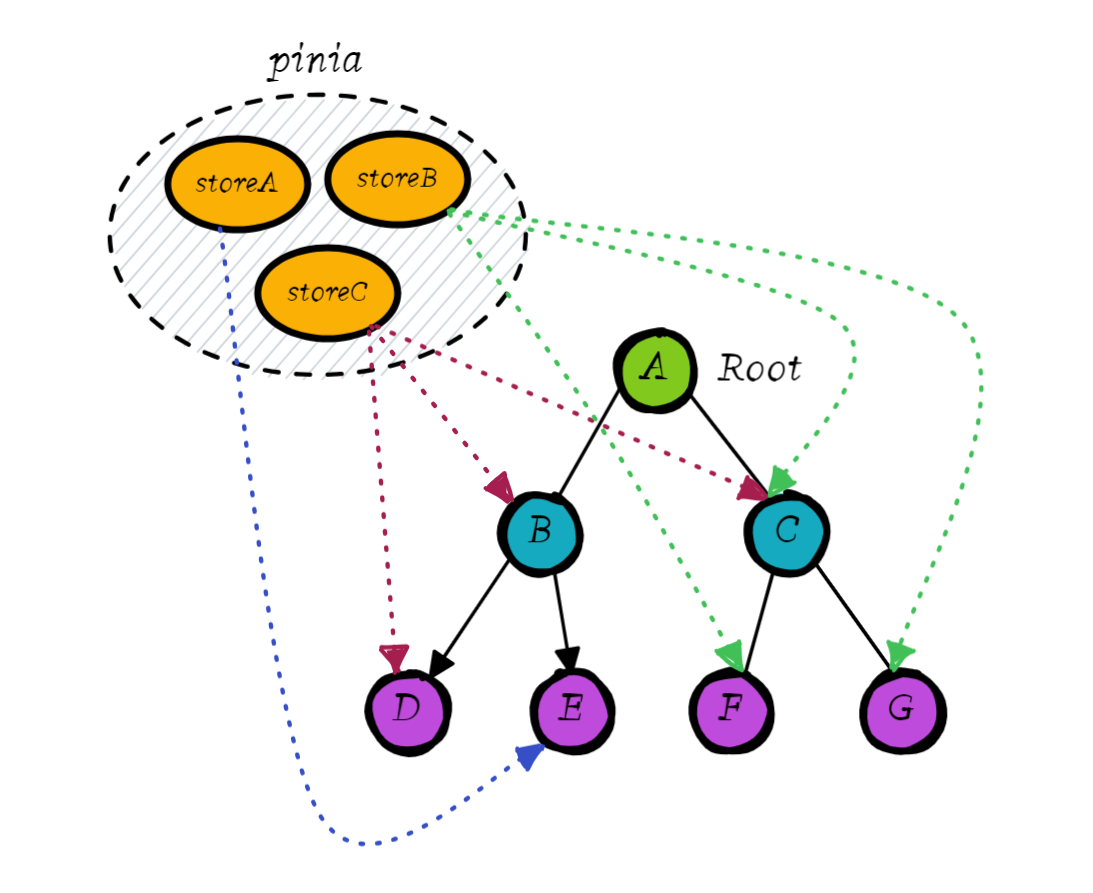
pinia 独立与组件之外,负责存储全局共享的数据;
在 pinia 内部可以根据业务逻辑的不同,把全局数据拆分为独立的 store 单元;
pinia 也遵循单向数据流的思想,保证了数据流向的清晰;
温馨提示
本套视频课主要讲解 Vue3 框架层面的核心内容,将来会单独出一个 pinia 有关的视频教程,为大家讲解 pinia 的完整用法。